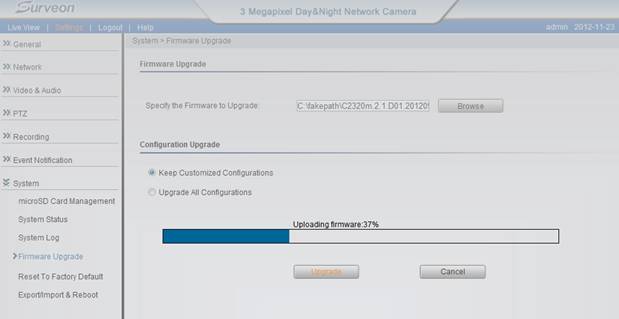
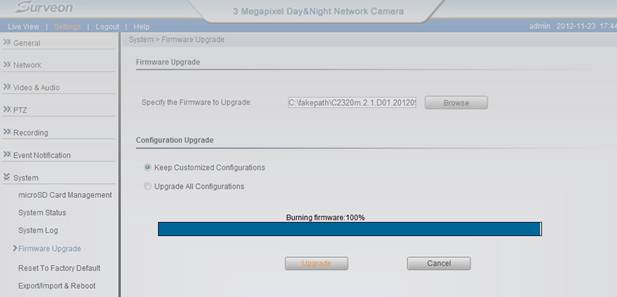
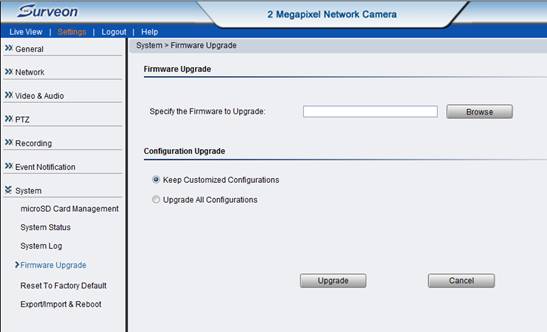
Firmware Upgrade
In certain cases, improvements to the camera firmware will be made to improve the image quality or enhance the usability of the camera. You can download the latest camera firmware on our website to apply these upgrades http://www.surveon.com/support/firmware.asp. Once you have obtained a new firmware file, firmware upgrades can be performed under System > Firmware Upgrade.
Below are steps to upgrade the firmware.
1.Download the firmware on a PC.
2.
Access the camera via IE browser.
3.
Go to Settings > System Firmware Upgrade.

4.
Enter the path of the file in the provided field or click Browse to find the file.
5.
Select Keep customized configuration to keep current configuration settings, or Upgrade all configurationsto clear all settings back to factory defaults.
6.
Click Upgrade to start the upgrade.
7.
The firmware will be first uploaded to the camera.
8.
After firmware is uploaded, system will ask you to confirm if you want to continue. Click OK to continue.
9.
Then the camera will start to burn the firmware.
Note: Please don’t close IE in this state or it may cause issues.
10.
Upon completion of firmware upgrade, the camera will reboot (you will be logged off).
During the firmware upgrade, the LED indicator in front of the camera will show steady amber. When the LED indicator turns green, the firmware upgrade is complete.
Please note that camera firmware must correspond with camera model. For example, file name: C2200m.C00.1.3.A13.bin works with CAM2200 only.
Reset to Factory Default
Camera resets can be performed under System> Reset To Factory Default.
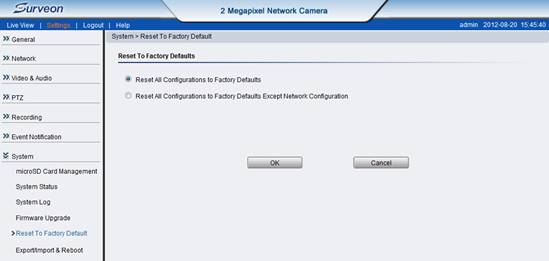
There are 2 types of reset.
1.Reset All Configurations to Factory Defaults
2.
Reset All Configurations to Factory Defaults Except Network Configuration
Type 1 is to reset all settings and configurations.
Type 2 is to keep the Network configuration, and reset all other settings and configurations.
Click OK after choosing a reset option to perform a reset.
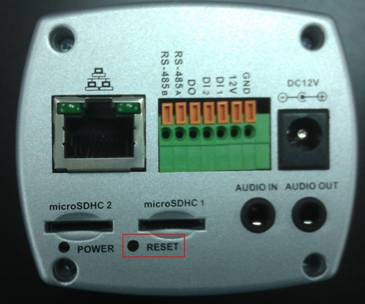
Alternately, you may choose to do hardware reset to perform a complete reset of the camera (no configurations retained).
The hardware reset methods for different camera forms are as below.
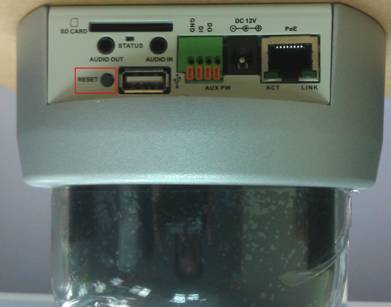
1.Box camera
Use a pin to poke the “Reset” hole for 5 seconds then release.
During hardware reset, the LED indicator of the camera will blink in red.
2.Bullet camera
2.1
Unscrew the back cap of the bullet camera.

2.2 Use a pin to poke the hole for 5 seconds then release.
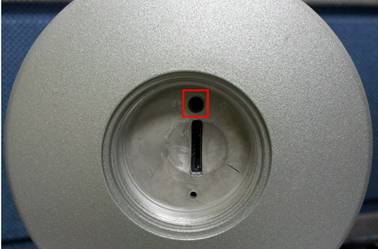
During hardware reset, the LED indicator of the camera will blink in red.
3.
Dome camera
3.1 Remove the cap of the dome camera.
3.2 Press the button for 5 seconds then release.
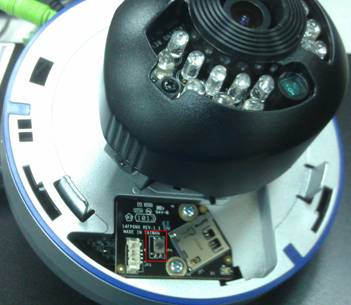
During hardware reset, the LED indicator of the camera will blink in red.
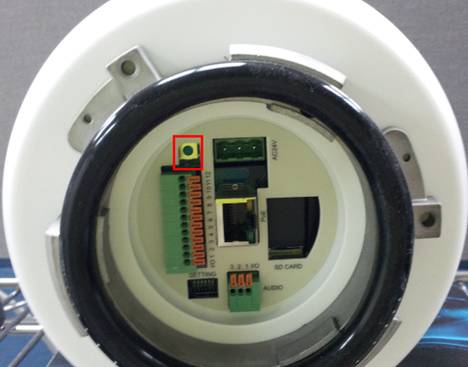
4.
PTZ dome camera
On the back of the camera, press the reset button for 5 seconds.
During hardware reset, the LED indicator of the camera will blink in red.
5.
Speed Dome (CAM6351)
On the back of the camera, press the green button for 5 seconds.
During hardware reset, the LED indicator of the camera will blink in red.
NVR Recording Storage Requirement
Number of Camera |
Bit Rate Setting (MB) |
Storage/Day (GB) |
Storage/Week (GB) |
Storage/Month (GB) |
HD Requirement for One Month (2TB,RAID5) |
1 |
1 |
11 |
81 |
327 |
2 |
4 |
1 |
43 |
324 |
1309 |
2 |
8 |
1 |
87 |
649 |
2618 |
3 |
16 |
1 |
173 |
1296 |
5236 |
4 |
32 |
1 |
346 |
2591 |
10472 |
7 |
64 |
1 |
691 |
5184 |
20943 |
12 |
1 |
2 |
22 |
161 |
655 |
2 |
4 |
2 |
87 |
649 |
2618 |
3 |
8 |
2 |
173 |
1298 |
5236 |
4 |
16 |
2 |
346 |
2591 |
10472 |
7 |
32 |
2 |
691 |
5183 |
20944 |
12 |
64 |
2 |
1383 |
10369 |
41887 |
22 |
1 |
4 |
43 |
322 |
1309 |
2 |
4 |
4 |
173 |
1297 |
5236 |
4 |
8 |
4 |
346 |
2595 |
10472 |
7 |
16 |
4 |
691 |
5182 |
20943 |
12 |
32 |
4 |
1382 |
10365 |
41887 |
22 |
64 |
4 |
2765 |
20737 |
83773 |
43 |
My day time image is correctly focused but switching to night mode causes a drop in image brightness/quality.
On models with ALC (3260, 4160, 4220, 4260), optimum brightness may not be achieved with the default ALC level. ALC level is related to aperture size. Level 1 represents the biggest aperture size. Level 6 represents the smallest aperture size. In night mode, it requires bigger aperture to allow enough light come in the camera to have brighter image. Please adjust the ALC Fix Level (Video& Audio>Image Appearance>Night Profile>ALC Fix Level) to level 1~3 to have brighter image.
What is the differences between IR Cut filter (ICR) and Dual Band filter?
IR cut filter:
- 1. Eliminating Infrared Light
- 2.
Filtering Incoming Light (Removing Non-visible Spectrum)
During the daytime, filtering out the infrared (IR) portion of the spectrum from incoming light will result in improved color picture quality. However, in nighttime conditions, IR light can be used in image capture. This is the motivation behind Day/Night cameras, which have a switchable IR Cut Filter. During daytime, the IR Cut Filter is in place, filtering out IR light that is unusable for color imaging. During nighttime, the IR Cut Filter is removed, and an infrared picture can be captured using IR LED illuminators.
Dual-Band Filters are similar to IR Cut Filters, in that they function to correct the incoming light source. However due to the fact that they do not remove the IR light, pictures will exhibit a slight color skewing (typically toward red) and are suitable only in indoor models with IR LEDs, such as CAM4110/4210
Why does the system continue to prompt for Active-X installation if I have installed it already?
How to fix image banding issue?
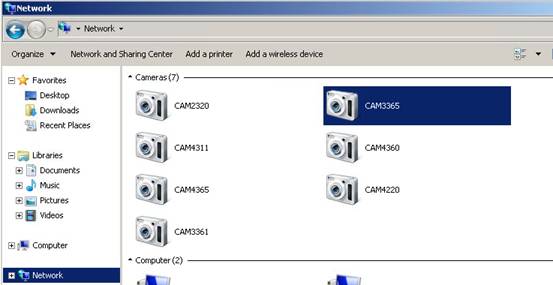
How to access Surveon network camera via the IP network?
Direct link to a network camera from a computer
This is the most practical and easiest way to access your network camera for the further camera settings and network configuration.
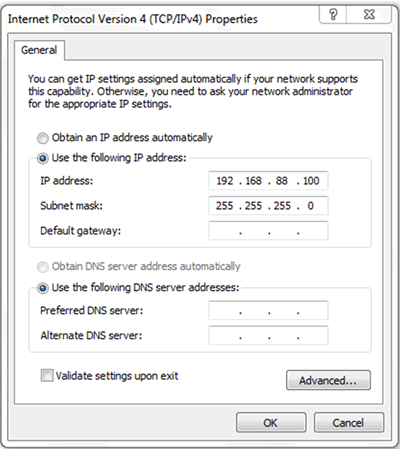
NOTE: All the Surveon network cameras have a default IP: 192.168.88.10. Change IP address of your computer to 192.168.88.x with subnet mask 255.255.255.0
Once the network camera and the computer are set to the same network segment, open an IE and input camera's IP 192.168.88.10 in the address bar then click enter.
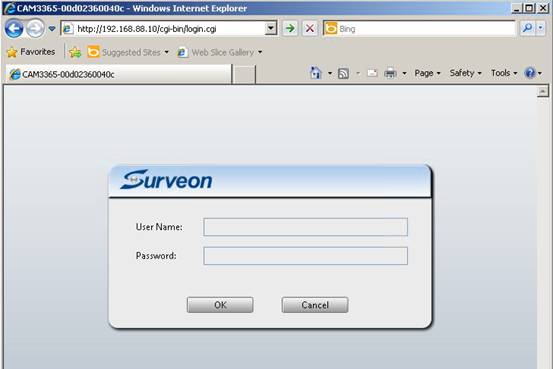
Input ID/password to log in.
Now, your computer is connecting to the camera successfully.
Accessing the camera within a LAN
Fixed IP
You can manually give each network camera and the PC with fixed IP addresses.
In this example, we give each device with 10.10.10.x and subnet mask as 255.255.255.0 to setup a simple local area network.
Open an IE and input the assigned IP address of the network camera. Now you are connecting to the network camera with fixed IP address in a LAN network.
UPnP
When the networks camera and the computer are within the same network segment, with the camera’s UPnP function enable, all the network cameras will be shown in Network.
DHCP
When the network cameras' IP addresses are assigned by a network router or a DHCP server from which your computer also gets an IP address, please install Surveon IP Camera Utility to search for the cameras in the LAN.
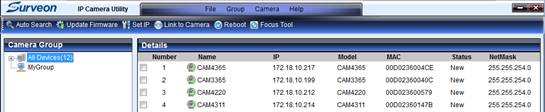
Via IP Camera Utility, click “Link to Camera” and it will bring up the selected camera's webpage.
What do all those image appearance terms mean and when to apply?
Function |
Function description |
Application conditions/scene |
| Brightness | Picture of dark adjustment | Any scenes are applicable. |
| Sharpness | Sharpness adjustment | Any scenes are applicable. |
| AGC Gain | Low as environment automatically improve Gain values for compensating brightness |
Night or in a dark environment. NOTE: this adjustment only insufficient illumination, and does not affect the General brightness of the image under adequacy setting. |
| Flickerless | Flash compensation |
Applies to 50Hz/60Hz power at the same time there is a scene. |
| Frequency | System frequency setting |
Required in accordance with its own power supply frequency for setting. |
| White Balance | White balance setting |
According to the needs of the environment color select the white balance mode. |
| 1. AWB | Auto white balance |
Any scenes are applicable. |
| 2. MWB | Manual white balance |
Any scenes are applicable |
-R Gain |
Red color temperature adjustment |
(Collocation MWB mode uses) |
-B Gain |
Blue color temperature adjustment |
(Collocation MWB mode uses) |
| 3. Indoor(3200°K) | Fixed color temperature to reconcile the indoor temperature 3200°K |
Suitable for indoor lights |
| 4. Indoor (4200°K) | Fixed color temperature to reconcile the indoor temperature 4200°K |
Suitable white lamp |
| 5. Outdoor (4800°K) | Fixed color temperature to reconcile the outdoor temperature 4800°K |
Suitable for outdoor General scene |
| 6. Outdoor (6700°K) | Fixed color temperature to reconcile the outdoor temperature 6700°K |
Fixed color temperature to reconcile the outdoor |
| Shutter mode | Set up automatic / manual electronic shutter |
Any scenes are applicable |
| 1. Auto | Automatic electronic shutter |
Collocation DC-Drive Lens or Fix Lens |
- Max Shutter Speed |
Automatic electronic shutter speed setting |
Apply the General scene |
- Slow Shutter Mode |
Low shutter speed according to the environment when setting the brightness to compensate |
Suitable for low according to the brightness of the environment, the disadvantage is that there will be a trailing after startup of ( a normal phenomenon ) |
| 2. Manual | Manual ( fixed ) electronic shutter |
Collocation DC-Drive Lens |
- Shutter Speed |
Manual ( fixed ) electronic shutter speed setting |
Apply the General scene |
- DC-Iris |
DC-Drive Lens ON / OFF Set |
ON : Lens aperture dimming OFF: lens aperture not dimming, fixed in the fully open State |
| Day/Night Mode | Day night / mode switch (ICR and black and white color ) |
Most often applied to the night scene |
| 1. Auto | Auto mode, on the basis of Night/Day Threshold switching of set points |
Most often applied to the night scene |
- Night Threshold |
Set day → night switching point |
Need to adjust in accordance with the site environment |
- Day Threshold |
Set night → may switch point |
Need to adjust in accordance with the site environment |
| 2. Day Mode | Set continuous day mode |
Most often used in the daytime or artificial lighting |
| 3. Night Mode | Nighttime mode |
Most often used in night or low light scenes |
| 4. Schedule for day mode | Set a scheduled time to switch between day and night modes |
Adjustable according to the site requirements |
Backlight Compensation |
Used to compensate for strong background lighting |
Applies to environments with strong background lighting |
Does SMR Series/NVR 2000 support hot swapping?
Yes, but while the server is running and recording, only hot swap the certain hard drive with the indicator showing red light.
Note: If you use RAID 0, there’s no data protection, once the indicator shows red light, you need to power off the system to replace all hard drives.
What is RAID? What is JBOD? How do they work together?
A RAID system provides the following benefits:
‧Fault Tolerance:
All hardware can fail. A failed component can be replaced. However, a disk drive failure destroys the data within. RAID technologies provide fault tolerance for disk drives by combining multiple disk drives into one or more logical arrays. If a single drive fails, data can still be retrieved from other members of a RAID array. A RAID1/3/5 array can sustain a single drive failure (more with RAID1 if the failed drives still have a mirror); a RAID6 array can withstand simultaneous failures of two members.
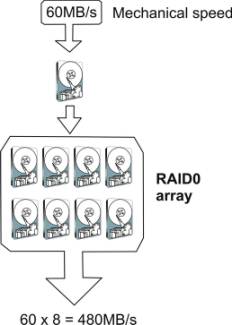
‧Performance Gain:
RAID also provides combined performance by simultaneous disk access. For example, the performance of a RAID0 array approximates the mechanical speed of individual drive times the number of drives within an array.
The performance of the arrays composed in other RAID levels will be slightly reduced because of the efforts on extra reads and writes and the parity computation.
An advanced RAID system is also capable of algorithms that facilitate performance handling I/Os of various characteristics.
‧RAID system:
An external RAID system is an enclosure powered by a single or redundant RAID controller, and consists of power supplies, ventilation system, and other enclosure devices that provide the ease of maintenance. The RAID controllers distribute the I/O requests to individual disk drives and provide fault tolerance by managing the logical array configurations and generating parity blocks through XOR computation.
‧JBOD:
A JBOD (Just a Bunch of Drives) is a drive enclosure that accommodates multiple disk drives. These drives are interfaced through a common backplane and are accessed through JBOD controllers that provide either the Fiber Channel bypass or SAS expander functionality. The JBOD enclosures attach to a managing RAID system, thus providing an easy means to quickly expand array capacity to many folds.
If I need to access through a firewall in a local network, which ports I need to open?
You will need to open the following ports: SMTP(25), HTTP(80), FTP(20,21,etc). If you need access from a client over the Internet, open the OMNI(2809). If you have cameras connected through the Internet, open HTTPs(443), RTSP(554, etc).
Is NVR series RoHS compliant?
Surveon products are tested and produced in compliance with the Europeans Union Restrictions on Use of Hazardous Substances in Electrical and Electronic equipment (RoHS) Directive 2002/95/EC for six regulated substances. The certification is applicable to all Surveon products shipped after April 15, 2006.
Where can I get the latest NVR user's documents?
You have 2 ways to get the latest NVR user’s documents.
1.In NVR's product CD.
2.Via our web site.
2.1 Go to http://www.surveon.com/product/nvr.asp
2.2 Click the NVR model.
2.3 Click the User Manual link.
2.4 The document will display for you to save.
How do I retrieve video clip or images to a computer?
1. On a PC running the NVR client software, browse in the NVR server,
2. Open the Playback window.
3. Use Cue In and Cue Out button to specify the time period for the video clip.
4. Click Save Clip to retrieve the video clip and save to your PC.
Can storage space be re-used for cyclic recording?
In the NVR client software, we provide a “Retention Days” function to keep certain days of recorded video. If Retention Days are 30, recorded video files that are over 30 days old will be re-used for cyclic recording. We also provide a "Minimum Free Space" function that allows users to preserve certain amount of storage space and in case you run out of storage space when emergency events occur.
Why is my SMR running slowly?
If user aware the SMR running slowly, it might be related to two reasons:
CPU utilization rate is high
1. User can reduce the number of VI to offload the CPU utilization rate.
2. User can use camera motion detection instead of general motion detection
3. User can reduce the liveview channels in single screen to offload the CPU utilization rate.
RAID under initialized or degraded/rebuild mode
1. If the RAID of SMR is under initialized, the SMR may run slowly. User can wait for one or two days to finish the initialization process.
2. If the RAID of SMR is in degraded or rebuild mode, the SMR may run slowly. For degrade mode, user needs to replace the problem hard disk. For the rebuild mode, user needs to wait for one or two days to finish the initialization process.
Why does my SMR show initialization in disk manager?
After running the wizard, the SMR will do the initialization on RAID. It may take one day to two days depends on the size of hard disk.
Why can’t I see the liveview in NVR2000?
NVR2000 doesn’t support local display. User need use remote client to see the liveview
Can I increase the channels for SMR or NVR 2000?
Yes, user can purchase the license dongle to increase the channels.
How many VI does the SMR can support?
SMR2000: 6
SMR5000: 10
SMR8000: 25
Can SMR/NVR support dual Ethernet ports?
No. User only can use one Ethernet port in SMR/NVR.
Does the OS run on RAID or DOM for SMR?
In normal status, the OS is run on RAID. But in following cases, the OS will run on DOM for doing OS clone purpose
1. Initialization
When user run the installation wizard, the OS will run on DOM and clone the OS image to RAID subsystem. After reboot, the OS will run on RAID.
2. Reinstall
When user executes the reinstall procedure, we will provide user a tool to force the OS boot from DOM to execute the initialization wizard.
Why some features can’t work normally when I use VMS client 2.5.0 to access VMS server 2.4.8?
Answer: VMS client 2.5.0 is not fully compatible with VMS server 2.4.8. We list some compatible issue in the following table.
Function |
Description |
Result |
Reason |
| 1. Add View |
|
|
|
| View can be kept | Fail |
Compatible issue |
|
| Camera list in view can be kept | Fail |
Compatible issue |
|
| 2. Playback & Instant Playback | |||
| In Playback Time Search, there is recording mark on the time bar and it can playback | Fail |
Compatible issue |
|
| 3. Rule Setting | |||
| The Going out and Tailgating setting can be recorded in alarm rule management. | Fail |
2.5 new feature |
|
| 4. Event Log | |||
| It can record shutdown and reboot log in system log. | Fail |
2.5 new feature |
|
| The General Motion and Camera Motion event can be recorded in system log. | Fail |
Compatible issue |
|
| The event log can record the VI event. | Fail |
Compatible issue |
|
| It can report Raid Failure, Disk Error and System Error in system log. | Fail |
Compatible issue |
|
| 5. Add IPCAM |
|
|
|
| If client uses General option to add the camera in VMS, VMS can show the live view streaming. | Fail |
2.5 new feature |
|
| 6. Domain server |
|
|
|
| If SMR2.4.8 server is disconnected, VMS 2.5.0 client can reflect the status and the SMR will show offline. | Fail |
Compatible issue |
|
| 7. System status |
|
|
|
The statistic of CPU fan will show the value. |
Fail |
Compatible issue |
|
| 8. VI function |
|
|
|
| There is VI event log in event windows in 2.5.0 Remote Client. | Fail |
Compatible issue |
|
| There is preview streaming in Going Out and Tailgating setup page in 2.5.0 remote Client | Fail |
2.5 new feature |
Why should I increase Virtual Memory?
When using a number of megapixel cameras, more virtual memory is necessary. In order to improve the system performance, it’s highly recommended to increase the virtual memory to 4GB. Please follow the instructions below to adjust.
How do I increase Virtual Memory?
In Vista/ Win7
- Right click My Computer and then Properties.
- In the left panel, click Advanced System Settings.
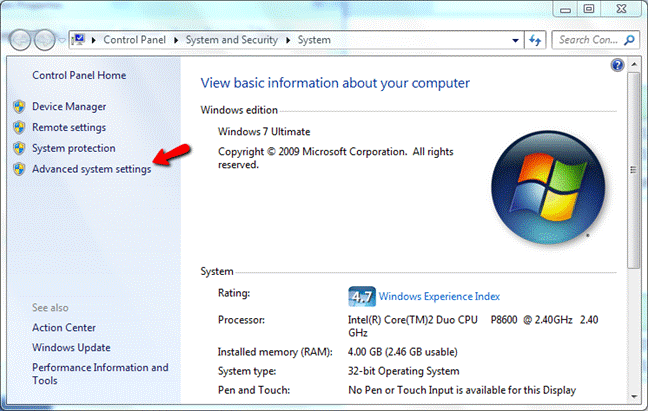
3. On the Advanced tab, under Performance, click Settings.
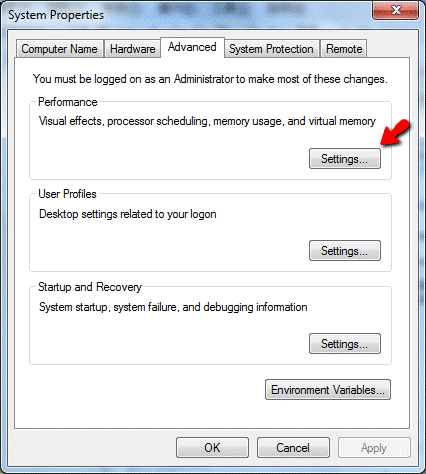
4. Click the Advanced tab, and then, under Virtual memory, choose Change.
5. Click Custom to change the Initial size (MB) and Maximum size. See the hot tip above.
Supported OS
Below are supported OS.
32-bit :
Windows XP Professional, Home; Vista Home Basic, Home, Premium, Business, Enterprise, Ultimate; Windows 7 Home Basic, Home Premium, Professional, Enterprise, Ultimate
64-bit :
Windows 7 Home Basic, Home Premium, Professional, Enterprise, Ultimate
Live View image is not being displayed
Firewall and/or Anti-virus software may block ports necessary to view the video feed. Please ensure that the following ports are open: SMTP(25), HTTP(80,8080), FTP(20,21), OMNI(2809), HTTPS(443), and RTSP(554, 8554).
How do I configure a surveillance network with an NVR server?
If the client, server and IP cameras are located in the same LAN, and their IP addresses are assigned by a network router or a DHCP server, you may simply use the VMS installed in the client to access the server then add cameras. Or you may set up fixed IP addresses for the client, server and IP cameras and use the VMS installed in the client to access the server then add cameras.
If the server and IP cameras are located in the same LAN and client is located in the WAN, you need to set up port forwarding for the client to access the server. Please refer to the application note - AN_How to set up port forwarding for SMR, PC-VMS.
What information can I provide to technical support for a faster solution for surveillance issues?
SMR/NVR issues
Please provide below information.
- SMR/NVR series model name.
- Software version.
- The number of cameras added.
- The number of VI set.
- The type of VI set.
- Connected camera brand.
- Connected camera firmware version.
- Connected camera bitrate/fps/resolution setting.
Please also follow the application note, How to export system log in SMR, to provide system log.
IP CAM issues
Please provide below information.
- Image appearance page snapshot.
- Video streaming page snapshot.
- System log.
- Environment snapshot.
- Camera firmware version.
- Can the camera be reached by Ping command?
- Can the camera be logged in via IE browser?
- Can the issue be fixed by hardware reset?
Does NVR software support motion detection?
Yes, in the VMS version higher than 2.4.7A09, the default recording rule will be easy motion recording. Once the Surveon IP camera is added to the NVR, the software will automatically set up Camera Motion detection for the camera. User only needs to adjust the sensitivity settings and motion detection area size. If the added camera is not Surveon camera, user needs to check if the Camera Motion detection is set up. But for 3rd party camera, we suggest user to check whether the 3rd party camera motion detection are setup correctly after adding camera.
If you version is lower than or equal to VMS2.4.7A08, you need to follow below steps to enable the motion detection.
1. Go to Setup -> Camera List.
2. On Video Analytics, select Camera Motion Detection.
3. Select the camera that you want to set up motion detection.
4. Click New to create a detection area.
5. Adjust the detection area size and location.
6. Set Sensitivity and Percentage. Then click OK.
7. A panel will pop up to ask you go to Alarm Rule Settings. Click OK.
8. Click New then input a name for the alarm rule.
9. On Conditions, click Camera Motion Detection, then select the camera that you want to include in this alarm rule.
10. On Actions, click Recording Controls, then select the cameras that will do this action once camera motion detection is detected.
11. Click Save.
12. Go to Setup ->Server-> Global/Individual Schedule.
13. On Edit Schedule, click Event (orange square) then mark the time period that you want to enable event recording.
14. If you choose Individual Schedule, be sure to select the camera then check Enable Individual Schedule box.
15. Click OK.
16. Go to Setup ->Server->Pre/Post Alarm Recording Settings to adjust the pre/post alarm recording time. Default time is 45 minutes. You may adjust to 5 minutes to save storage space.
17. Then the motion detection recording is well set up.
Why is my NVR server not detected on the Device List?
It may be because of the firewall settings. To allow a management session between a Client station and an NVR server, users should configure the firewall properly. To configure the Windows firewall, access the Windows Security Center in the Windows Control Panel, and then click on Windows Firewall.
In the Windows Firewall window, click the Exceptions tab and add Client software programs (XXX, XXX, and XXX) to the list of exceptions. Once the selections have been made click OK, and re-run the NVR Client software. If the management session still cannot be established, make sure that there are no hardware firewalls in the gateways and routers on your network.
What stream your VMS is used for recording?
Surveon VMS always use streaming 1 for recording.
Why my remote VMS client can’t show playback or VI correctly?
Please ensure the time zone VMS server/NVR server/SMR server is the same as the time zone in your remote VMS client PC.
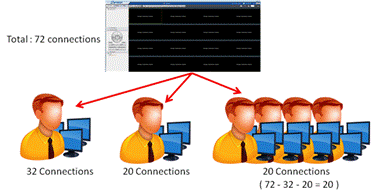
How many users/clients can access live view video at the same time?
We don’t limit the user but the total connections.
We can support 72 connections to live view at most.
If the number of total connection exceeds 72, the warning message will be popped out to remind the users.
For example, you have 6 users. If the first user occupies 32 connections, the second user occupies 20 connections, and then the rest users can only create under 20 connections in total.
Can I use “High Resolution Stream” in multi-divisions layout?
Yes, but strongly NOT recommend.
Using proper resolution is very important to keep your VMS system in stable state. Since the decoding will consume lots of CPU resource, if the CPU is always busy to decode the video, the system must be slow down. So, with proper resolution, you can utilize the CPU effective, see the smooth video, and whole system work in a steady pace.
So, what it the proper resolution? Assuming the resolution of your monitor is 1920*1080. And you use 3*3 layout which is divided into 9 divisions, and the entire screen is fully for displaying the live video of cameras. Each division is displayed under the size of “640*360”.
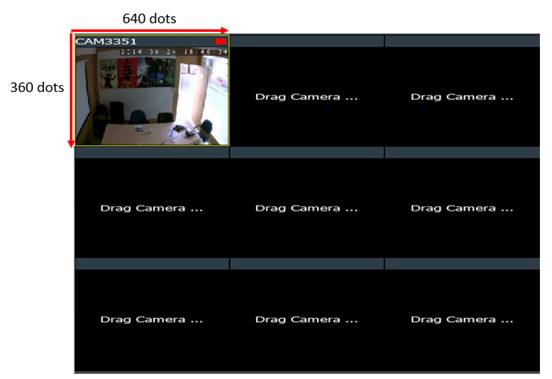
When the video resolution is larger than 640*360, there will only part of the pixels be displayed in such division. The reason is because each division can only display 640 dots in horizontal,and 360 dots in vertical. The total number of dots in one division is fixed. You can’t put more dots into a fixed-size division.
For example, customers put a 1920*1080 (2M) in the division, there only 640/1920 will be display in horizontal and 360/1080 in vertical. It has no difference when you use a normal stream2 (640*360).
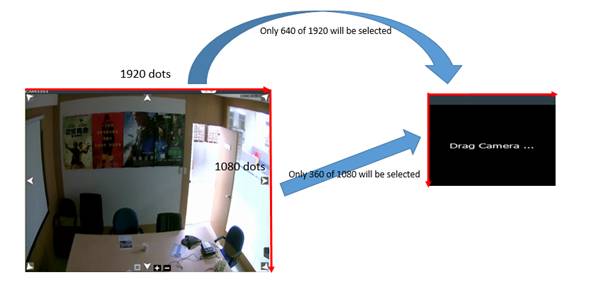
You might ask “What if I use less quality, I use VGA (720*480)”. The case is identical. There is almost no difference. No matter what size you choose, once the video source has higher resolution video than the division size, the result is always the same – Only part of dots will be displayed.
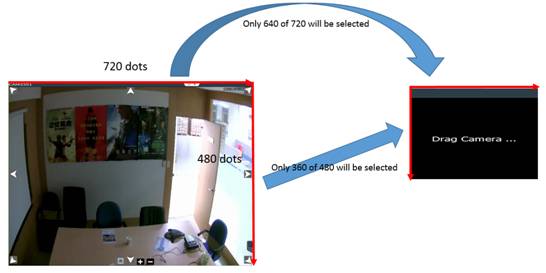
So just use the closest and proper solution to your current display. You don’t need to always select the highest resolution.
I have a problem when configuring the SMR9500 series. I can’t find the proper time zone in the time settings, and no content is listed in the dropdown menu.
This is because the version of your remote client mismatched to the server.
When you found no time zone in the dropdown menu, sometimes you will also see the error message:System.AccessViolationException: Attempted to read or write protected memory.
It is very easy to fix this problem. You just need to use the remote client with 2.5.0.A09 or later.
You can download the correct version via the download link below: https://www.dropbox.com/s/2fvqt1a0mdup3vu/VMS%20Remote%20Client%202.5.A09.zip?dl=0
Please remember that remove the old version first, then install the correct version.